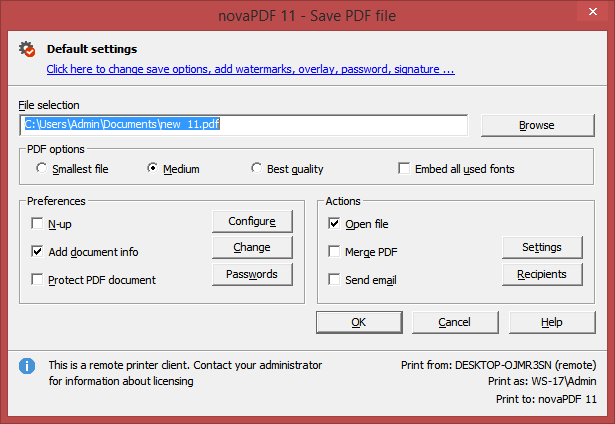
The standard save dialog is shown when the Prompt standard save dialog option is selected on the General tab (from the Printing Preferences -> Manage Profiles window). This allows you to select additional options for the PDF to be saved, such as its filename/location, if you want it merged with another existing PDF file (append/insert) and whether to open the PDF automatically after conversion and/or send it via email.

File name
In the file name field you can:
- manually type a name for the generated PDF file without specifying the path, in this case the PDF will be saved in the last used folder
- use the Browse button to select a location where the PDF should be saved
If a PDF file with the same name already exists in the destination, the new PDF file will either be merged with it (if you chose to do so in the Merge with PDF file section) or you'll be asked to overwrite it.
You can also enter network paths (UNC) in the File name field in case the folder where you want to save the PDF is not on the local computer. Only a full path is allowed. For example, suppose \\PDF_Server\PC1 is mapped on your workstation as drive X, then the following paths are both valid and indicate the same folder: \\PDF_Server\PC1\PDF or X:\PDF.
PDF Options
Choose a the printing quality for the resulting PDF. The Smallest file will result in creating a PDF with a small size, while the Best quality will create one with better image quality.
Best quality
If this option is checked the resulting PDF file will be larger than by using the Small file option, however the quality of the images will be better. This option is recommended if you need a PDF file that's suitable for printing, where the quality of images is important. If you need a PDF file to put on the web or to send via email, you should use the Small file option to reduce its size.
Medium
You can choose this option if you want a balance between the quality of the resulting PDF and its size.
Smallest file
This option is checked by default and the compression engine used in this case optimizes the resulting size of the PDF file. This option is recommended in most cases when you need to send the resulting PDF file via email, put it on the web or use it for distribution. It's a balance between size of the resulting PDF file and the quality of images, so if you need to have higher quality images in the resulting PDF files select the Best quality option.
Embed all used fonts
If this option is checked, the fonts used in the original document will be embedded in the PDF file. While this ensures you that the recipient will see the PDF with the same fonts used in the original document, it also has the disadvantage that the filesize of the resulting PDF is larger than without using the Embed fonts option. Only the characters used in the original document will be embedded, to avoid having unnecessary font characters included (novaPDF does font subset embedding).
PREFERENCES
Using the options from this section you can set whether to perform an action or not after the PDF file was generated and saved.
Merge PDF
Check this option to insert or append the PDF being currently created with an existing one. If this option is checked you must also click on Settings to set the merging options (what file to merge with, password protecting the resulting file,...).
Add document info
If you check this option (enabled by default), the resulting PDF file will include the document information that you've set in Document Information. These settings can be modified by clicking on the Change button and only apply to the current print job. To add the same document information for all print jobs, you must open the Profile Manager and change the information in General.
Protect PDF document
If this option is checked, the PDF file will be encrypted based on what you've set up in the Security tab (from Manage Profiles ). You can also change the encryption settings only for the current print job by clicking on Passwords (this affects only the current print job).
ACTIONS
The actions in this section are executed after the PDF file is generated.
Open file
This is selected by default. The resulting PDF file will be opened in the default PDF viewer once the conversion is finished. Uncheck it if you don't want it automatically opened.
Send email
If you check this option, after the PDF file is created it will be sent via email to the recipients specified in the Recipients section. If the email properties are not set, you'll get a warning letting you know that you have to configure the email sending options (otherwise you'll have to uncheck the Send email option from this page to continue creating the PDF without emailing it). You can also modify the recipients that will receive the email only for the current print job by clicking on Recipients.
NOTE: If you use a printing profile that has an action associated to send email via MAPI/Outlook/Gmail after the PDF is created, the Send email option will be checked by default. You'll be able to click on Recipients to configure the email details.
Not registered...
If novaPDF is not registered, a message will be shown in the lower left side of this window. You can click on it to open the Activate window and copy/paste the registration name and key you received after ordering novaPDF.
Note: Some of the features mentioned on this page might not be available in your edition. The Professional edition includes all the features, while Standard and Lite have limited functionality. For a comparison between editions, please check feature matrix topic.


