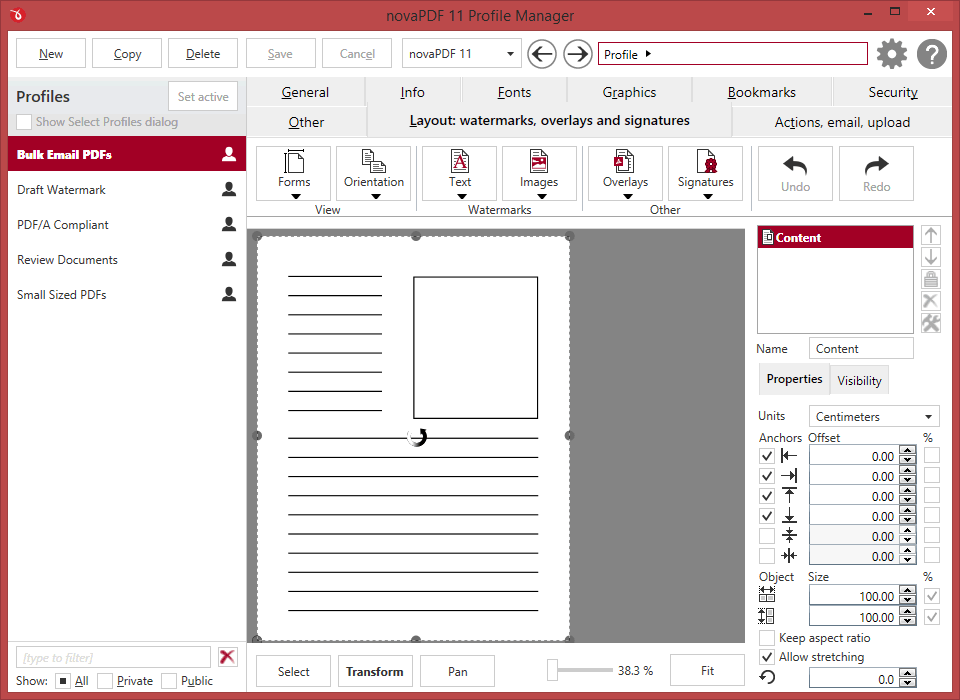
The Watermarks, overlays, signatures profile manager tab allows you to modify the layout of the resulting PDF file, giving access to several features such as:
- choosing a predefined page size form from the list of 40+ available ones
- setting a page orientation (landscape/portrait)
- inserting and customizing the layout of watermarks (text/images)
- inserting and customizing the overlays
- digitally signing the PDF and modifying the layout of the signature

Forms
This will let you choose one of the predefined page size forms available. After you select a form, you'll see the size of the content layer change in the live preview section. You can manage the forms (i.e. define your own custom form) in Printing Preferences as described in the Manage Forms section of the help.
Orientation
This lets you specify how the page is positioned. Available options are Portrait and Landscape. The orientation can also be set from the printing application.
- Portrait. Portrait orients the print vertically (longest edge of the page is vertical).
- Landscape. Landscape orients the print horizontally (longest edge of the page is horizontal).
Text watermarks
You can insert text watermarks that will be included in the resulting PDF file. This means that even if in the original document (one being converted to PDF) there is no watermark, it will be added automatically when the conversion is done to the resulting PDF file. Depending on the number of added watermarks the size of the resulted PDF files will increase.
From this drop-down you can choose to insert one of the default text watermark presets. You can add new or manage the existing text watermarks by clicking on New / Manage. You can read more about predefined text watermark presets in the Manage Presets->Text Watermarks help section.
Image watermarks
Just as with text watermarks, you can also insert images to be included as watermarks in the resulting PDF file. Depending on the size and number of image watermarks, the resulting PDF will increase in size. From this drop-down you can choose to insert one of the default image watermark presets. You can add new or manage the existing image watermarks by clicking on New / Manage. You can read more about predefined text watermark presets in the Manage Presets->Image Watermarks help section.
Overlays
PDF documents overlay (could also be called PDF stitching), means that you can insert the content of a PDF file in another PDF document (either in front of the existing content or as the background for the existing one) and create a single PDF file containing the merged information. For example, if you have a PDF template branded with your company information (that shows in the header/footer) and you received other PDF documents that need to use the same template, you can overlay the new document with the existing template and create a single merged branded PDF.
From this drop-down you can choose to insert one of the default overlay presets. You can add new or manage the existing overlays by clicking on New / Manage. You can read more about predefined overlay presets in the Manage Presets->Overlays help section.
Signatures
Using this option you can apply a signature to a created PDF file even if the original document does not have any signatures or copyright protection. The signature will be applied automatically when the file is converted. All you have to do is to enable and customize it and all the created PDF files will contain the signature applied afterwards. The option can be disabled at any time or a separate Profile containing the option can be created and used when needed.
A digital PDF signature is a code that can be embedded in a portable document (PDF) so that the sender will be uniquely identified. Its main purpose is to attest that the document was indeed created by the individual/organization claiming to be the author. A digital signature contains several encryption techniques to guarantee its security. Digitally signing PDF documents is useful when using it for branding, protecting and copyrighting information in the resulting PDF file.
From this drop-down you can choose to insert one of the default signatures presets. You can add new or manage the existing signatures by clicking on New / Manage. You can read more about predefined signatures presets in the Manage Presets->Signatures help section.
Layout preview and LAYERS
Live preview
You can preview changes you do to the layout of the resulting PDF without actually saving them. Every layout operation you do will show live in the preview section.
Select/Transform/Pan/Fit
The controls at the bottom of the Live preview window allow you to manipulate the layers easier. You can use the Select option to choose a particular layer, the Transform option to apply changes to the selected layer, or Pan to be able to reposition all the layers in the current view. You also can Zoom in/out on the current view by using the slider or the scroll wheel on your mouse and Fit the entire design in the current view.
Layer management
Each layout element you add that will be included in the resulting PDF is positioned on a layer. The general layer is Content, meaning the actual content that you have in the original document. All other elements (watermarks, overlays, signatures) are added as layers shown in the Layer Management field. Each of the layer has a Name that you can modify and you can bring layers forward or send them backwards using the up/down arrows on the right of the field. You can also remove a layer and lock it (locking a layer prevents accidental edits to it, a locked one cannot be modified). Each layer will have an icon in front showing what type is it: content, watermark, overlay or signature.
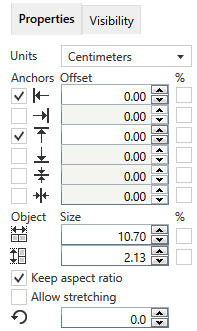
Properties

Units
You can change the measurement units from the Units drop down list. The available values are millimeters, inches and points. Changing the units will recalculate the margins, origins and object sizes.
Margins
You can manipulate layers by setting different margins. The Anchors will let you choose what edge to use as a landmark when calculating the given margin. The numbers you enter in the Offset field are expressed in the selected measurement unit by default, unless you choose to use percentages of the total form width/height (you can do this by checking the box under the % heading):
- Left. You can set the left margin of the layer page by entering a value or pressing the up/down arrows. The number you enter is expressed in the selected measurement unit (unless you check the % box to use percentages of the total width).
- Right. You can set the right margin of the layer page by entering a value or pressing the up/down arrows. The number you enter is expressed in the selected measurement unit (unless you check the % box to use percentages of the total width).
- Top. You can set the top margin of the layer by entering a value or pressing the up/down arrows.
- Bottom. You can set the bottom margin of the layer by entering a value or pressing the up/down arrows.
- Horizontal center. If this is checked, the horizontal center of the form will be used as a landmark for the margin you enter in its field.
- Vertical center. If this is checked, the vertical center of the form will be used as a landmark for the margin you enter in its field.
Object
Each element you add can be modified in size by entering a value for it in the Size field (or using the up/down arrows to modify it). The size can be in the unit of measurement (by default) or as a percentage of the total form dimensions. You can modify individually the width/height and you can retain the overall aspect of the object by leaving the Keep aspect ratio option enabled. If Allow stretching is selected instead, the width and height can be adjusted individually without retaining the original aspect of the object.
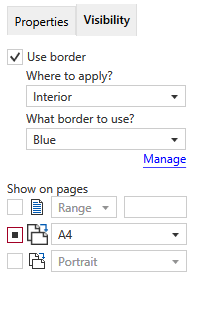
Visibility

Use border
For every element added you can select the Use border option to add a border around it. When this option is selected you can choose to have the border drawn Outside of the element, in the Interior of the element or leave it Normal. Borders have their own default presets that can be modified by clicking on the "..." button next to the name of the preset (i.e. Dashed is a default border preset). Border presets can be used by multiple profiles, you can read more about the available options in the Manage Presets->Borders help section.
Show on pages
You can decide where each inserted element can show:
- First/Last/Odd/Even/All or Range of pages
- Only on pages that match the selected page Format (i.e. A4, A3,...)
- Only on pages that match the selected Orientation (i.e. Portrait/Landscape)
Note: Some of the features mentioned on this page might not be available in your edition. The Professional edition includes all the features, while Standard and Lite have limited functionality. For a comparison between editions, please check feature matrix topic.


