This tutorial shows how to add automatically bookmarks to a PDF file using novaPDF, even if in the original document there are no bookmarks. This way the resulting PDF will have shortcuts to the most important sections in the document.
On this page:
- What are PDF bookmarks?
- How to enable bookmark detection and add bookmark definitions
- Setting additional options for the PDF bookmarking feature
novaPDF Pro has the ability to add bookmarks in a PDF file based on formatting detection rules. This means that you can configure novaPDF to convert a word/sentence/paragraph that has a specific format to a PDF bookmark by using bookmark definitions. Example: you have a 3 page document and on each page a title that has a font size of 22. You enable in novaPDF bookmark detection and add a definition to recognize text that has the font size of 22 and convert it to a bookmark.
When you print your document to novaPDF, it will look through your entire text for words/sentences/paragraphs that respect the formatting rule (font size=22) and convert those to bookmarks in the PDF file. Of course this is a simple example, as novaPDF can detect formatted text based on the font type used and/or font size, font style (italic/bold) or even font color, and convert that to bookmarks that can have different style or color options.
The PDF bookmarking feature is very useful when needing to structure the resulting PDF file. For instance, when you have a document with multiple pages, you will need it to be better structured so that the recipient will be able to see a list of bookmarks on the left side of the document and easily access different key sections in your document.
What are PDF bookmarks?
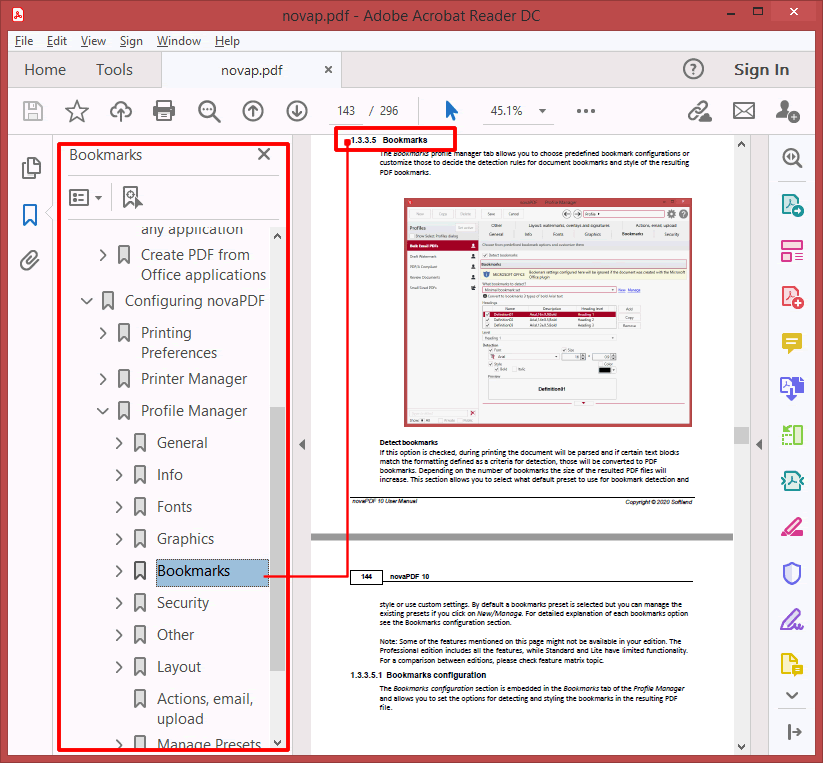
PDF bookmarks appear on the left side of the pdf reader window (in Adobe Reader pressing F4 will toggle the visibility of the Bookmark panel) given that the created PDF contains this functionality.
The usability of the PDF bookmarks comes from the fact that it can be used as a shortcut menu, allowing users to easily go to other sections in the PDF document. Consider a 300 page document and you'll see how this presents an advantage as users don't have to scroll looking for a specific section.
PDF bookmarks can be considered a clickable table of contents list, the difference being that a table of contents is more difficult to use because it's present at the top of the document, while bookmarks are available on the left side of the document (outside of it) and you can access them no matter on what page of the document you are (no need to scroll all the way to the top to see the table of contents). Using PDF bookmarks you can give the user an easy way to access all important sections and sub-sections of the PDF when they need to (Bookmarks panel can be switched on and off), as well as an easy way to print a specific page (right-clicking a boomark will show the option to print the pages where it links to - all pages until next bookmark will be printed).
Here's an example of how bookmarks look in a PDF opened with Adobe Reader:

How to enable bookmark detection and add bookmark definitions
Since novaPDF supports different profiles, configuring novaPDF to add bookmarks when creating PDF files can be done through its Profile Manager window. Note that once the feature is enabled for a profile and bookmark levels are defined, those will be added when creating a PDF file with novaPDF from any document that supports printing (so you don't have to go in manually each time you create a PDF to enable bookmarks). To enable bookmarks and add definitions:
- Open Printer Manager (go to Start and type "printer manager" in Windows 10/8 or go to Start->novaPDF->Printer Manager in Windows 7 or previous) then click on Profiles->Manage Profiles. If you have an administrator password set, you'll be required to enter it to make changes.
- Select the profile that you want to enable bookmarks for (or if you don't have one profile defined enter a name for it in the General tab) and click on the Bookmarks tab.
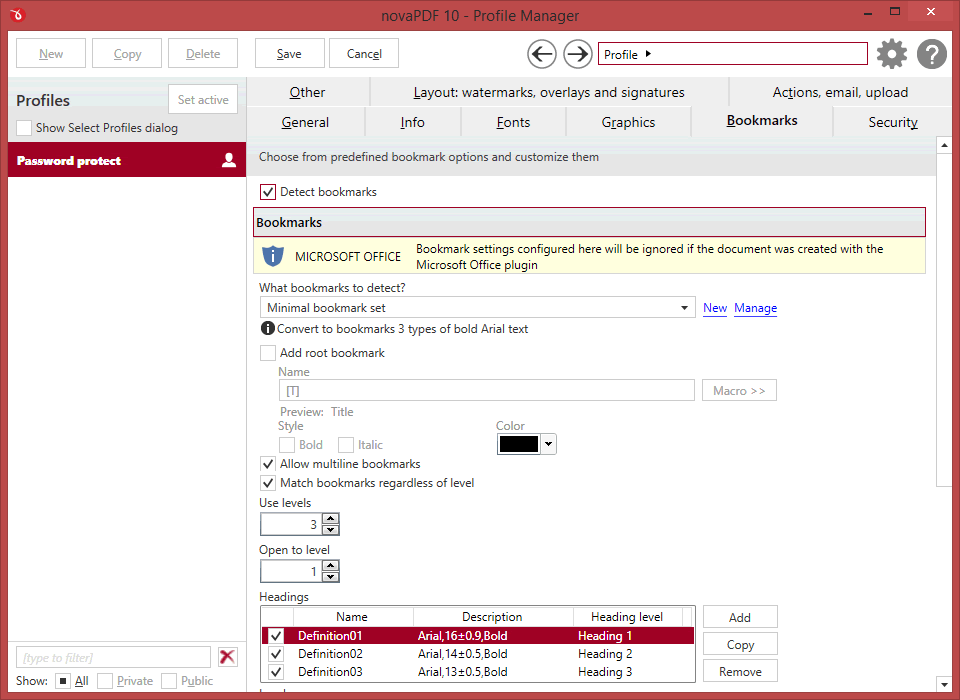
- Check the Detect bookmarks option to enable bookmark detection.
You'll see the other settings in that page become available under Bookmarks. Under What Bookmarks to detect select one of the existing presets for bookmark detection. You can select Microsoft Office heading styles to have the same type of heading definitions from Microsoft Office detected and converted to bookmarks (useful when you convert a Word document for instance to a PDF).

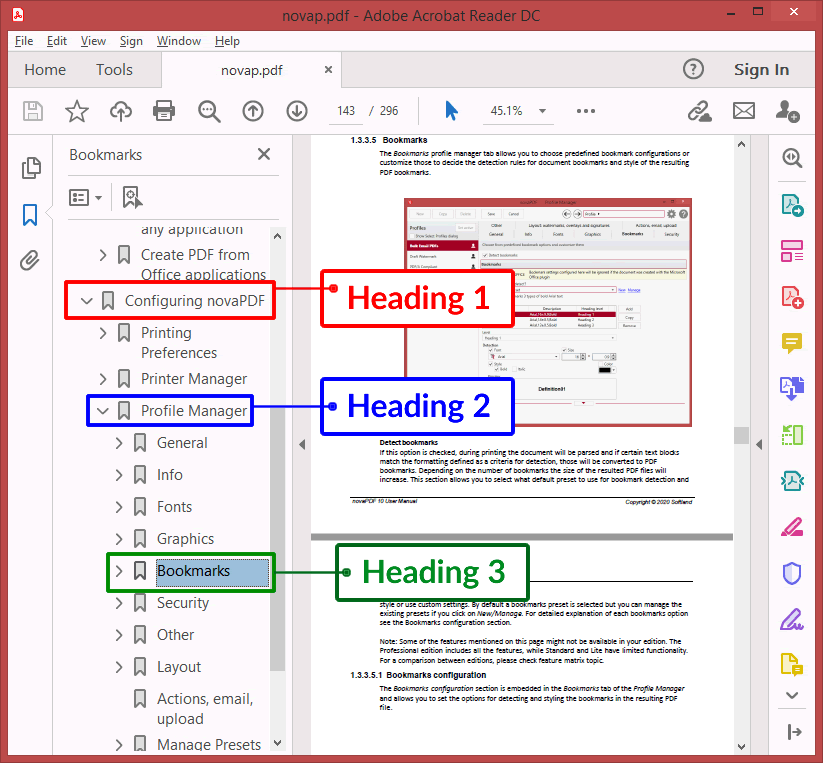
Before you start adding bookmark definitions you need to understand the bookmark levels (called Headings) included as predefined bookmark presets. There are 9 bookmark levels that can be added (Heading 1 through Heading 9), each with one or more possible definitions. The first entry in the Bookmarks list (Heading 1) will be shown on the resulting PDF file on the first level, the second entry in the Bookmarks list (Heading 2) will be shown in the resulting PDF file on the second level (as a child of the first level) and so on. Below you can see how Heading 1, Heading 2 and Heading 3 bookmark levels look like in the resulting PDF file (each level can be formatted with a different style or color, the font size though will remain the same):

In order to add a bookmark and define its detection rules and display options:
- In the Bookmarks tab after you check the Detect bookmark option you you can configure the detection and display options. Options that you can set when adding bookmark definitions:
- Definitions list - this list shows the Name, Description and Heading Level of the currently selected bookmark detection presets. A checkbox is also displayed in front of each definition Name, that you can use to enable/disable that particular definition (checked means Enabled). To the right you also have buttons to Add a new definition, Copy an existing one or Remove them.
- Detection - this section lets you choose what detection rules to use for the text in the original document for the selected bookmark definition item. For instance, if you select the Arial font type and set a Size of 20, then if novaPDF encounters in the original document a word or sentence that has these particular formatting rules it will make that a clickable bookmark in the resulting PDF file. Detection options you can set are based on: the Font type (Arial, Verdana, Times New Roman, ...), font Size, font Style (Bold, Italic) and Color. You may note that near the Size box there's an additional +- field - this is needed because some programs even if they contain fonts of a specific size they will send to novaPDF smaller or larger sized fonts with a margin of up to 2 points - by adjusting this novaPDF will be able to accurately detect that specific font size (e.g. if you set a Size of 20 and a +- margin of 1, novaPDF will look for text with the size between 19.01 and 20.99). As you change the detection options, you can see in the Detection preview window how the text that will be converted to bookmarks looks in the original document.
- Display- here you can set the font style and color for the Bookmark items. This will only change the font style and color of the clickable text that will be available in the PDF via the Bookmarks panel (it will not modify the actual text from the PDF, it is used only for the Bookmarks panel). As an example, if you are defining a Heading 1 bookmark level and in the Display you check Bold and Italic, in the PDF file these clickable bookmark links will be bolded and italicized (only for the Heading 1 level).
- After you have added and configured the desired definitions, click Save in the Profile Manager window (top-left corner) save these changes for the current profile.
- If you want to test how the PDF bookmarking works, open a document that supports printing (a Word document for instance) and that contains text formatted as set in the Detection options, go to File ->Print, select novaPDF from the Printers list and click on Print. Note: You cannot add PDF bookmarks to an existing PDF file with novaPDF if the PDF file had fonts embedded.
Setting additional options for the PDF bookmarking feature
On the Bookmarks tab in novaPDF's Profile Manager window you also have some additional options: Allow multiline bookmarks, Match bookmarks regardless of level, Use Levels and Open to level.
Description and examples for these options are given below.
Allow multiline bookmarks
- Option checked - if in the original document (you're converting to PDF) there is text that spans on two consecutive lines and this text matches a bookmark definition added in novaPDF, in the PDF file this will become a single clickable bookmark.
- Option unchecked - if in the original document (you're converting to PDF) there is text that spans on two consecutive lines and this text matches a bookmark definition added in novaPDF, in the PDF file each of the two lines will be a clickable bookmark.
Match bookmarks regardless of level
- Option checked - this option has an effect only if there are at least 3 headings defined (bookmark levels). Let's say that novaPDF's Bookmarks window you have 3 definitions added: Heading 1, Heading 2 and Heading 3. If in the original document (you're converting to PDF) there is a portion of text that matches the definition of Heading 1, and after that (not "right after" that) a portion of text that matches the definition of Heading 3, in the PDF file there will be a Heading 1 bookmark, underneath it a blank bookmark ("dummy node"), and after that a Heading 3 bookmark.
- Option unchecked - let's assume the same example as above (you have 3 bookmark definitions Heading 1, Heading 2 and Heading 3). If in the original document (you're converting to PDF) there is a portion of text that matches the definition of Heading 1, and after that (not "right after" that) a portion of text that matches the definition of Heading 3, in the PDF it will be shown as bookmark only the text portion that matched the Heading 1 bookmark definition (the text that matched the Heading 3 bookmark will not be shown because there's no Heading 2 bookmark).
Use levels - this allows you to specify which bookmark levels will be shown in the PDF. By default, as you add bookmark levels (Headings) this will increment automatically. For instance, if you have three bookmarks levels (Heading 1, Heading 2 and Heading 3) and the value in Use levels is 2, only Heading 1 and Heading 2 will appear in the PDF (if the original document has text that matches these definitions). For the same example, if Use levels was set to 3 all three Headings would have appeared in the PDF.
Open to level - this lets you specify until which level should the PDF reader expand the bookmarks in the PDF file. By default this is set to 1 (meaning only the Heading 1 bookmark level will be expanded) but it can be set up to the value of Use levels. For example, if you have 3 bookmark levels defined and Open to level is set to 3, all 3 bookmark levels will be expanded in the PDF file.


