novaPDF is a PDF creator that allows generating PDF files from any Windows application that supports printing. This tutorial shows how to have text or image watermarks added in the PDF file even if in the original document there are no watermarks.
On this page:
novaPDF has the ability to apply a text or image watermark to a PDF file (the Standard or Professional edition). This means that even if in the original document (one being converted to PDF) there is no watermark, it will be added automatically by novaPDF when the conversion is done to the resulting PDF file. You only have to enable and customize the PDF watermarking feature only once through novaPDF's Printing Preferences window and future created PDF file will have the set watermark applied (you can disable it though or even better using novaPDF's profiles feature you can create a printing profile that adds a specific watermark, and another profile that creates PDFs without watermarks).
The PDF watermarking feature is very useful in cases such as:
- when you are creating a proof PDF file for a document that is not at its final version, so you add a text watermark that writes Draft on each page of the PDF file this way the recipient will know not to use it as the final version
- when you are creating a PDF file that contains confidential information, you can add a text watermark that says Confidential
- if you create a PDF for reviewing purposes only you can apply a Review purposes only watermark text so that the recipient will know not to use it for anything else
- to add a copyright notice to every page of the PDF file
- if you want to add the company logo on each page of PDF files to be created, you can do that by adding an image watermark (you can choose a custom position).
The possible uses list could just go on, but the point is that whether you're using the PDF watermark feature for branding or protecting a resulting PDF file, novaPDF offers you the options to do that.
How to add text watermarks
Since novaPDF supports different profiles, configuring novaPDF to add text watermarks when creating PDF files can be done through its Profile Manager window. Note that once the PDF watermarks feature is enabled for a profile and a text/image watermark is added, that watermark will be added when creating a PDF file with novaPDF from any document that supports printing (so you don't have to go in manually each time you create a PDF to enable the watermarks). To enable the PDF watermarking feature and to add a text watermark:
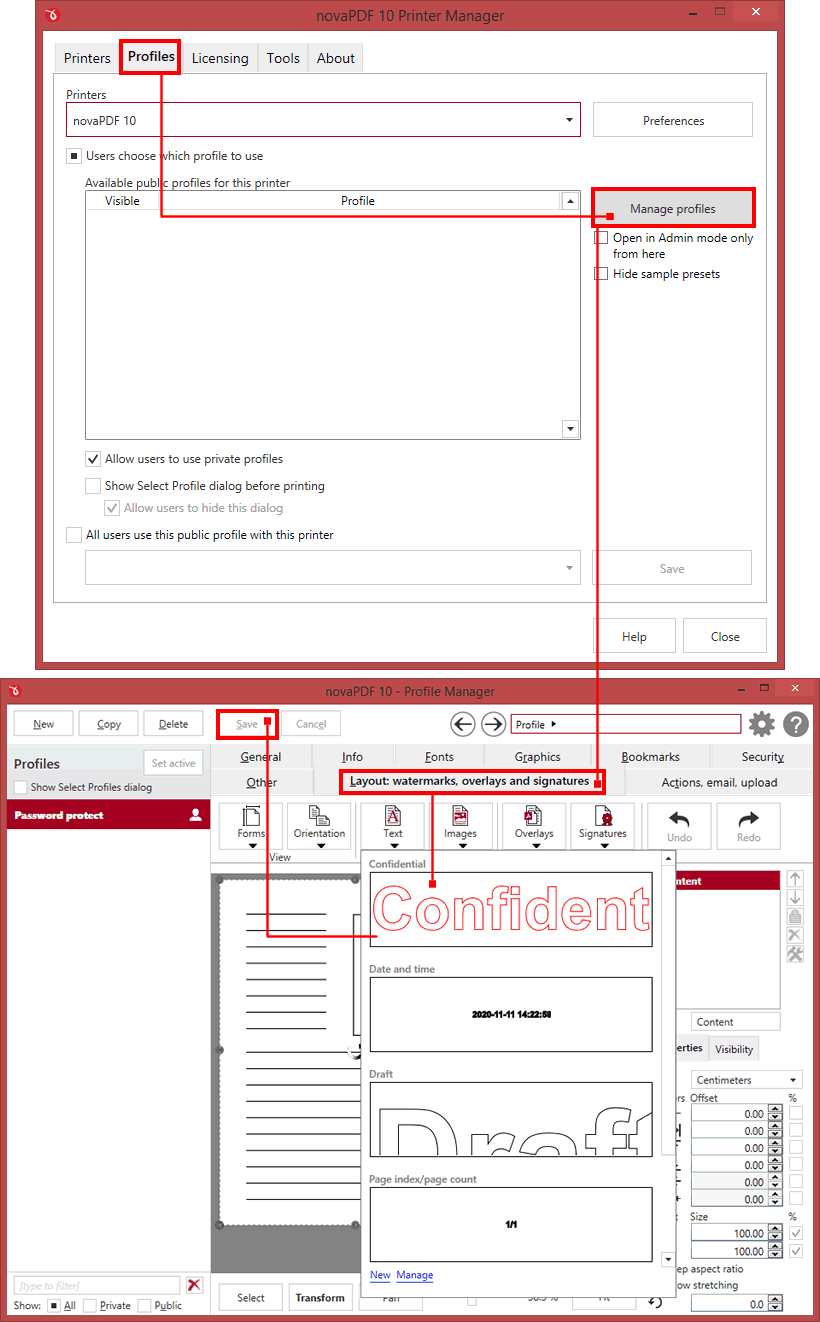
- Open Printer Manager (go to Start and type "printer manager" in Windows 10/8 or go to Start->novaPDF->Printer Manager in Windows 7 or previous) then click on Profiles->Manage Profiles. If you have an administrator password set, you'll be required to enter it to make changes.
- Select the profile that you want to enable watermarks for and click on the Layout tab. You'll see the document preview with several buttons at the top.
- Click on the Text Watermarks button to open a drop-down that shows the available predefined text watermarks. You can select one of the predefined ones and you'll see it show up in the preview window where you can modify its properties (position, size, visibility, ...). If you want to create a new text watermark and not to use one of the predefined ones, you can click on the New button at the end of the drop-down. This will open the Text Watermarks predefined section where you can define your own text watermark profile by setting the following options:
- Name - you can enter a name for the watermark (note this is not the text that will appear in the pdf, it's used only in the list of available watermarks that you see on the Watermarks tab and must be a unique name).
- Visibility - you can choose when you want the watermark to be displayed, when the PDF is Viewed, Printed or Exported (by default the watermark will be shown in all 3 cases).
- Text - the text you enter here is actually the text that will appear as the PDF watermark. Any character is accepted and as you type you will see in the Preview section how the watermark looks.
- Text properties - you can select here the type of the font (in the Font section), the style of the font (bold, italic and/or outlined), size of the font, color and opacity so that the text is not fully visible (values from 0 to 100).
- Preview - in this section you will be able to see how the text watermark will be displayed in the PDF file.
- Now that the text watermark is defined and saved it wil be shown in the Text Watermarks and will be available in Profile Manager->Layout as a predefined text watermark. Once you add it in the document you can
- If you want to test how the text watermark is printed, open a document that supports printing (a Word document for instance), go to File - Print, select novaPDF from the Printers list and click on Print. You'll see the watermark printed in the resulting PDF file.

How to add image watermarks
Just as it is the case with text watermarks, configuring novaPDF to add image watermarks when creating PDF files can be done through the Profile Manager window. To enable the PDF watermarking feature and to add an image watermark:
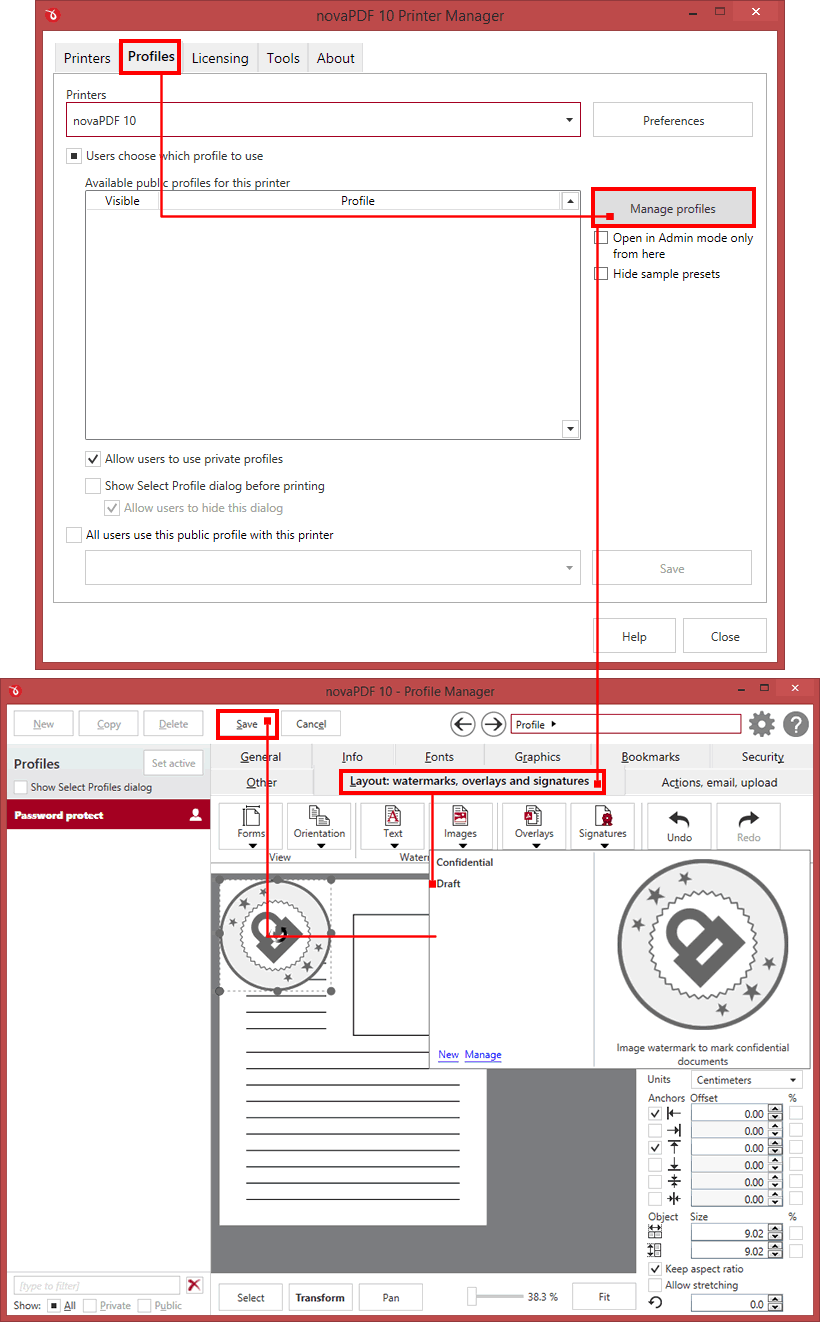
- Open Printer Manager (go to Start and type "printer manager" in Windows 10/8 or go to Start->novaPDF->Printer Manager in Windows 7 or previous) then click on Profiles->Manage Profiles. If you have an administrator password set, you'll be required to enter it to make changes.
- Select the profile that you want to enable watermarks for and click on the Layout tab. You'll see the document preview with several buttons at the top.
- Click on the Image Watermarks button to open a drop-down that shows the available predefined image watermarks. You can select one of the predefined ones and you'll see it show up in the preview window where you can modify its properties (position, size, visibility, ...). If you want to create a new image watermark and not to use one of the predefined ones, you can click on the New button at the end of the drop-down. This will open the Image Watermarks predefined section where you can define your own image watermark profile by setting the following option:
- Name - you can enter a name for the image watermark (the name is used in the list of available predefined watermarks that you see on the Layout->Image Watermarks section and must be a unique name).
- Visibility - you can choose when you want the image watermark to be displayed, when the PDF is Viewed, Printed or Exported (by default the watermark will be shown in all 3 cases).
- Image File - here you can browse and choose an image that will be used as the watermark. Image formats that are recognized: .BMP, .DDS, .GIF, .ICO, .JPG, .JIF, .JPEG, .JPE, .PBM, .PCX, .PNG, .PPM, .PSD, .TGA, .TARGA, .TIF, .TIFF, .XBM. After you select the image and click on Preview you'll be able to see if the image was loaded correctly and how it looks.
- Image properties - in here you'll be able to select an Opacity level for the image. Also, you can check the Transparent color option you can select a specific color from your image to be transparent when the image watermark is added to the PDF file. When this option is checked, the Color variation field is enabled too and you can add in there a value. This value represents the color tolerance. For example if you enter 0, only adjacent pixels of exactly the same color tone you chose are selected and made transparent. If you enter 10, a wider range of tones will be made transparent.
- Preview - in this section you will be able to see how the image watermark will be displayed in the PDF file.
- Now that the text watermark is defined and saved it will be shown in the Text Watermarks and will be available in Profile Manager->Layout as a predefined text watermark. Once you add it in the document you can adjust its position, depth, scale it and also choose on which pages to be displayed.
- If you want to test how the image watermark is printed, open a document that supports printing (a Word document for instance), go to File - Print, select novaPDF from the Printers list and click on Print. You'll see the image watermark printed in the resulting PDF file.


